Wednesday, March 25, 2020

Palo Alto Networks - GlobalProtect - Part IV

ATTENTION: Please visit the Palo Alto Networks Live site for the latest version of this post.

----------------------------------------------------------------------------------------------------------------

In my previous post, we covered security policy matching based on user identity and device context provided via the GlobalProtect app. We also enabled notifications to the end user based on compliance of the endpoint. In this post, we are going to configure Authentication Policy with MFA to provide elevated access for both HTTP and non-HTTP traffic to specific sensitive resources. You can see a diagram of the environment here.

The value in leveraging Authentication Policy with MFA is to ensure that regardless of whether or not a user is known and the device is compliant, they must authenticate with multiple factors to validate their identity prior to accessing a specific resource. This helps prevent lateral movement by malicious attackers that are persisting internally via a compromised machine or with phished credentials.

Note - This post assumes the following:
  • You have already followed the previous posts in this series.
  • You have DUO MFA configured
Although this capability can be configured without GlobalProtect for HTTP applications, we are going to focus on non-HTTP applications to highlight the GlobalProtect app's role in the authentication prompt process.

Part IV - Authentication Policy with MFA
  • Navigate to Device -> Certificate Management -> SSL/TLS Service Profile -> Add to create a profile that references the root CA created previously
  • Navigate to Device -> Authentication Profile -> Add to create a new profile that consists of the LDAP and DUO Server Profiles that were previously created
    • On the Authentication tab
      • Enter a Name
      • Set the Type to LDAP
      • Set the Server Profile to LDAP
      • Enter a Login Attribute  of sAMAccountName
      • Set the User Domain to your domain
    • On the Factors tab
      • Check the Enable Additional Authentication Factors check box
      • Add the Multi Factor Authentication Server Profile that was previously created as part of your DUO setup
    • On the Advanced tab, select the user group previously created to add to the Allow List
    • Click OK
  • Navigate to Device -> User Identification -> Captive Portal and click on the gear icon
    • Check the Enable Captive Portal check box
    • Select the SSL/TLS Service Profile and Authentication Profile that were previously created
    • Set the Mode to Redirect
    • Set the Redirect Host to an IP address of an interface on the firewall
      • In my case, its the IP address of my trust interface
    • Click OK
  • Navigate to Network -> GlobalProtect -> Portals -> select the previously configured portal -> Agent -> select the previously configured config -> App -> and change the following App Configurations parameters
    • Set Connect Method to User-logon (Always On)
    • Set Show System Tray Notifications to Yes
    • Set Enable Inbound Authentication Prompts from MFA Prompts (UDP) to Yes
    • Set Trusted MFA Gateways to the IP address referenced in your Captive Portal along with port 6082.
      • In my case its 192.168.1.254:6082
    • Click OK
  • Navigate to Objects -> Authentication -> Add to create a new Authentication Enforcement
    • Enter a Name
    • Set the Authentication Method to web-form
    • Set the Authentication Profile to the MFA profile that was previously created
    • Click OK
  • Navigate to Policies -> Authentication -> Add to create an authentication rule
    • Note - If you need a resource for testing, there are plenty of test SSH servers available publicly. In the example below, that is what I am using. 
    • As shown below, any user from the trust or gp zone that is destined to a specific server in the untrust zone will be prompted to authenticate, regardless of whether they are a verified user or not.
  • Commit the configuration
  • Lastly, when testing with a Windows client, make sure that the host firewall is allowing UDP port 4501 inbound.
You should now be able to test access to the resource. Here is the general workflow that you can follow:
  • Ensure that the GlobalProtect app is connected to either your external or internal gateway
  • From operational mode in the CLI, run the show user ip-user-mapping all type CP to show authenticated users
    • It should show 0 users
  • Attempt to access the resource referenced in the Authentication Policy rule, and you will see a prompt requiring you to authenticate
  • Upon authenticating via the factors you defined, you should be able to access the resource, as well as run the same show user ip-user-mapping all type CP and see your user account

Tuesday, March 24, 2020

Palo Alto Networks - GlobalProtect - Part III

ATTENTION: Please visit the Palo Alto Networks Live site for the latest version of this post.

----------------------------------------------------------------------------------------------------------------

In my previous post, we covered the expanded setup of GlobalProtect, which included multiple authentication types, as well as the creation of an internal gateway. In this post, we are going to modify security policy matching based on user identity and device context provided via the GlobalProtect app. We will also enable notifications to the end user based on compliance of the endpoint. You can see a diagram of the environment here.

The value in leveraging user identity and device context in security policy along with end user notifications allow for greater visibility as well as more granular control over what users can access. This same methodology is applicable regardless of user location, and best practices dictate that they should be leveraged wherever possible. If a user is outside of what is required in order to access resources, they can be notified or mapped to a different rule to provide the minimum level of access required in order to become compliant.

Note - This post assumes that you have already followed the previous posts in this series.

Part III - User/Device Context and Compliance
  • Navigate to Objects -> GlobalProtect -> HIP Objects -> Add to create one or more test objects that are applicable to your environment. 
    • Name the HIP Object and enable checking for something specific to your environment. In my case, I run Cortex XDR Prevent on my workstations, and I will be also testing via an iPhone, so I will create two objects called AV and iPhone.


  • Navigate to Objects -> GlobalProtect -> HIP Profiles -> Add to create a profile that references both of the previously created objects
    • Note - In the screenshot below, the profile will match based on either of the previously created objects
  • Navigate to Network -> GlobalProtect -> Gateways -> open each of the existing gateways -> Agent -> HIP Notification -> Add
    • Select the Host Information profile that was previously created
    • On the Match Message tab
      • Check the Enable check box
      • Enter a message
    • On the Not Match Message tab
      • Check the Enable check box
      • Enter a message

  • Navigate to Policies -> Security to create rules based on user group and device context
    • As shown below, we are adding our user group and HIP profile as match criteria
  • Commit the configuration
You should now be able to log into GlobalProtect and see a message similar to the following:


You should also be able to see rule matches via the Traffic logs.

In my next post, we will configure authentication policy with MFA for both http and non-http access to sensitive resources.

Palo Alto Networks - GlobalProtect - Part II

ATTENTION: Please visit the Palo Alto Networks Live site for the latest version of this post.

----------------------------------------------------------------------------------------------------------------

In my previous post, we covered the initial setup of GlobalProtect, which included a portal, external gateway, and user authentication via local database. In this post, we are going to configure multiple external authentication types as well as add an internal gateway. You can see a diagram of the environment here.

The value of adding an internal gateway means that when users are on the local network, user-to-IP address mappings will be supplied to the firewall along with device context. This data can then be used as security policy match conditions, allowing for much more granular, identity-based visibility and enforcement.

External authentication types are recommended for a production environment. In this case, we are going to configure the deployment to leverage LDAP authentication for the portal, MFA via RADIUS (AD credentials and Duo) for the external gateway, and LDAP authentication for the internal gateway. This will provide the best possible user experience for users when they are internal, while also enforcing additional factors of authentication when users are remote.

Note - This post assumes that you have already followed the previous post in this series.This post also assumes that you already have a domain controller (I am running Windows Server 2012 R2) in your environment installed with DUO authentication proxy installed and running. For details on DUO integration, see this post.

Part II - Expanded Setup
  • Navigate to Device -> Server Profiles and create the following:
    • LDAP Server Profile
      • Note - Best practices dictate that a dedicated service account be used for integrating your domain controller with Palo Alto Networks.
    • RADIUS Server Profile
      • Note - Per my note above, this post assumes that you already have Duo Authentication Proxy installed and running on your domain controller.
  • Navigate to Device -> User-ID -> Group Mapping Settings -> Add to create a Group Mapping
    • For Server Profile, select the LDAP profile that was previously created
    • Enter the domain name under User Domain
    • Navigate to the Group Include List and add the group where your users are stored.
      • Note - if you are unable to expand the available groups, this typically means that your credentials in the LDAP Server Profile are incorrect.
    • Click OK
  • Navigate to Device -> Authentication Profile -> Add
    • For Type select LDAP
    • For Server Profile select the LDAP profile that was previously created
    • Enter sAMAccountName for the Login Attribute
    • Enter your domain for the User Domain
    • Navigate to the Advanced tab and select the user group that was previously added to the Group Include List that was part of the Group Mapping that was previously created
    • Click OK
  • Navigate to Device -> Authentication Profile -> Add
    • For Type select RADIUS
    • For Server Profile select the RADIUS profile that was previously created
    • Enter your domain name of the User Domain
    • Navigate to the Advanced tab and select the user group that was previously added to the Group Include List that was part of the Group Mapping that was previously created
    • Click OK
  • Navigate to Network -> GlobalProtect -> Gateways -> select the existing external gateway -> Authentication -> select the client authentication -> change the Authentication Profile to the RADIUS profile that was previously created
  • Click OK
  • Click OK
  • Navigate to Network -> GlobalProtect -> Gateways -> Add to create an internal gateway
    • Select the Interface and IPv4 Address that correspond to the trust interface
    • Navigate to the Authentication tab
      • Select the SSL/TLS Service Profile that was created in the previous post
      • Create a new Client Authentication profile and select the LDAP Authentication Profile that was previously created
    • Click OK
  • Click OK
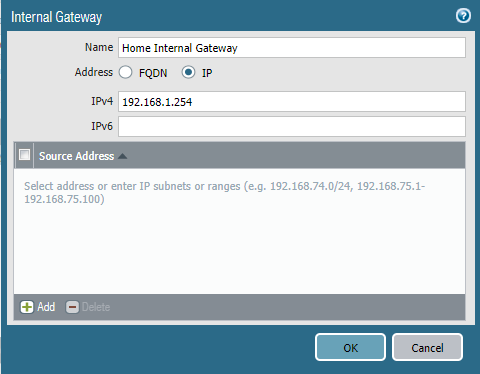
  • Navigate to Network -> GlobalProtect -> Portals -> select the existing portal -> Agent -> select the existing portal config -> Internal -> Internal Gateways -> Add to create an Internal Gateway
    • The IPv4 entry should correspond to the IP address assigned to the trust interface
    • Click OK
  • Navigate to the App tab, and set the Connect Method to User-logon (Always On)
    • NOTE - Internal Gateway authentication will fail if the Connect Method is set to On-demand
  • Click OK
  • Click OK
  • Navigate to Device -> Certificate Management -> Certificates -> Generate
    • Note - As you already created a GlobalProtect certificate in the previous post, you will be creating a new one that both the external and internal gateways can reference. The previous certificate contains a common name that refers to the IP address of the portal and external gateway. As the IP address of the internal gateway is not referenced, this will cause authentication to the internal gateway to fail. 
      • Note - Keep is mind that you could also leave the current certificate in place and just create a new one for the internal gateway (essentially having two), but for the purposes of this post we will be creating a single certificate to be used for everything.
    • Enter a Certificate Name
    • Enter the IP address or the DNS name of the interface to which remote users will connect for Common Name
      • Note - In this series of posts we will be using the public IP address for the common name (represented by 1.1.1.1). It is recommended to use a DNS name in a production environment, but IP addresses will work as well.
    • Select the root CA that was previously created for Signed By
    • Enter the IP address of the trust interface that corresponds to the internal gateway under Certificate Attributes
  • Navigate to Device -> Certificate Management -> SSL/TLS Service Profile -> select the existing profile that was created previously and change the Certificate value from the old certificate to the new one that was just created.
  • Click OK
  • Navigate to Policy -> NAT -> Add
    • Note - A NAT rule must be created so that the internal users can reach and authenticate to the portal from the internal network
    • In the General tab, enter a Name 
    • In the Original Packet tab, set the Source Zone to trust, Destination Zone to untrust, and the Destination Address to the untrust IP address (the IP address to which the GlobalProtect Portal is assigned)
    • In the Translated Packet tab, leave everything set to None
    • Click OK
  • Commit the configuration
You should now be able to be able to authenticate both internally and externally via the GlobalProtect app and access resources. It is important to note that authentication failures to an internal gateway are notoriously quiet. In other words, it will look as though you are connected even when you are not. You can validate connectivity by issuing the show user ip-user-mapping all type GP command. If there is no mapping present, then this means that the app was unable to connect and authenticate to the internal gateway.

In my next post, we will make changes to the configuration to include security policy matching based on user identity and device context via the GlobalProtect app. We will also enable notifications based on compliance of the endpoint.

Palo Alto Networks - GlobalProtect - Part I

ATTENTION: Please visit the Palo Alto Networks Live site for the latest version of this post.

----------------------------------------------------------------------------------------------------------------

In my previous post, I provided an overview of the GlobalProtect series and overall objectives, which included a description of each post in this series. I would recommend starting there prior to moving forward.

In this post, we will cover the initial setup of GlobalProtect, which includes a portal, external gateway, and user authentication via local database. You can see a diagram of the environment here.

Part I - Initial Setup
  • Navigate to Device -> GlobalProtect Client and download and activate the latest version. 5.0.8 is a TAC-preferred version at the time of this blog post.
  • Navigate to Network -> Network Profiles -> Interface Mgmt -> Add and create a management profile to apply to the public interface to which remote users will connect.
    • Enable https
    • Click OK
  • Create another profile to apply to the tunnel interface to which remote users will connect.
    • Enable Response Pages
    • Click OK
  • Navigate to Network -> Interfaces, and select the interface to which remote users will connect.
    • Navigate to the Advanced tab and apply the Management Profile created for the public interface above and click OK
  • Navigate to Network -> Zones -> Add and create a new Layer 3 security zone for your GlobalProtect users
    • Provide a name (i.e. gp)
    • Set Type to Layer3
    • Check the Enable User Identification check box
    • Click OK
  • Navigate to Network -> Interfaces -> Tunnel -> Add and create a new tunnel interface
    • Assign the interface a number (i.e. 1)
    • Assign the interface to the appropriate Virtual Router
    • Assign the interface to the appropriate Security Zone
  • Navigate to the IPv4 tab and assign a subnet to be used for your mobile users
    • Note that it should be a unique network. Also, note that an IP address on this interface is not a requirement.
  • Navigate to the Advanced tab and apply the Management Profile created for the tunnel interface above 
  • Click OK
  • Navigate to Device -> Certificate Management -> Certificates -> Generate and create a trusted root certificate
    • Note - In this series of posts we will be using self-signed certificates. It is recommended to use third-party certificates in a production environment, but self-signed certificates will work as well.
    • Enter a Certificate Name
    • Enter the management IP of the firewall for the Common Name
      • Check the Certificate Authority checkbox
      • Enter information in other fields if desired (optional)
        • Click Generate
      • Select the certificate you just created, and check the Trusted Root CA checkbox
      • Click OK
  • Navigate to Device -> Certificate Management -> Certificates -> Generate and a create certificate for GlobalProtect
    • Enter a Certificate Name
    • Enter the IP address or the DNS name of the interface to which remote users will connect for Common Name
      • Note - In this series of posts we will be using the public IP address for the common name (represented by 1.1.1.1). It is recommended to use a DNS name in a production environment, but IP addresses will work as well.
    • Select the certificate created in step 6 under Signed By
    • Enter information in other fields if desired (optional)
    • Click Generate

  • Navigate to Device -> Certificate Management -> SSL/TLS Service Profile -> Add
    • Enter a Name
    • Select the Certificate created in step 7
    • Click OK
  • Navigate to Device -> Local User Database -> Users -> Add
    • Enter a Name and Password
    • Click OK
  • Navigate to Device -> Authentication Profile -> Add
    • Enter a Name
    • Select Local Database for Type

    • Navigate to the Advanced tab -> Add
    • Select All
    • Click OK
  • Navigate to Network -> GlobalProtect -> Gateway -> Add
    • In the General tab
      • Enter a Name
      • Select the interface to which remote users will connect
      • Select the IPv4 Address of the interface
        • Note - If your interface is assigned an IP address via DHCP, then you will not have an option to select an IPv4 Address. Just leave this field set to None.
    • In the Authentication tab
      • Select the SSL/TLS Service Profile previously created
      • Under Client Authentication click Add
        • Enter a Name
        • Select the Authentication Profile previously created
    • In the Agent tab
      • In the Tunnel Settings tab
        • Enable Tunnel Mode
        • Select the Tunnel Interface previously created
      • In the Client Settings tab
        • Click Add
        • In the Config Selection Criteria tab, enter a Name

        • In the IP Pools tab
          • Add an IP Pool

        • In the Split Tunnel tab
          • Add an access route to the Include section
            • Note - In this series of posts we will be routing all traffic through the tunnel. It is recommended to tunnel all traffic in a production environment to ensure consistent protection.
          • Click OK
        • In the Network Services tab
          • Enter values for Primary DNS and Secondary DNS
          • Click OK

  • Navigate to Network -> GlobalProtect -> Portal -> Add
    • In the General tab
      • Enter a Name
      • Select the Interface to which remote users will connect
      • Select the IP Address of the interface
    • In the Authentication tab
      • Select the SSL/TLS Service Profile previously created 
      • Under Client Authentication click Add
        • Enter a Name
        • Select the Authentication Profile previously created
        • Click OK
    • In the Agent tab
      • Click Add under Configs
        • In the Authentication  tab
          • Enter a Name

        • In the Internal tab
          • Enable Internal Host Detection IPv4
          • Enter an IP Address of resource that is always available internally
          • Enter the Hostname of the IP address to which it resolves
            • Note - Internal Host Detection uses a reverse lookup to determine whether or not a device is on the internal network in order to establish a VPN tunnel. See this post for additional details if you do not have an internal DNS server.
        • In the External tab
          • Add an External Gateway
            • Enter a Name
            • Enter the Address to which remote users will connect
        • In the App tab
          • Change the Connect Method to On-demand
        • Click OK
          • Note - In subsequent posts, we will be setting the Connect Method to User-Logon (Always On), as that is the recommended best practice.

      • Back in the Agent tab, click Add under Trusted Root CA
        • Add the Root CA
        • Check the Install in Local Root Certificate Store
          • Note - Selecting this option will transparently install the trusted root CA so that we can test SSL Forward Proxy decryption in the future. It is not required in order for GlobalProtect to function.

        • Click OK
  • Navigate to Policies -> NAT and add the gp zone you created previously to your source NAT rule so that users in the gp zone can get out to the Internet
  • Navigate to Policies -> Security and add security policy rules so that users in the gp zone can access internal as well as public resources
  • Navigate to Policies -> Security and add a security policy rule that allows remote users to access GlobalProtect portal
  • Commit the configuration
You should now be able to log into the portal, download and install the GlobalProtect App, and test connectivity.

In my next post, we will make changes to the configuration to include different forms of authentication and add an internal gateway.